CLEANING IN-EAR HEADPHONES: HERE’S HOW IT WORKS!

Lesezeit 8 min

CLEANING IN-EAR HEADPHONES: HERE’S HOW IT WORKS!

THE RIGHT CLEANING, DRYING AND HYGIENE FOR YOUR IN-EARS

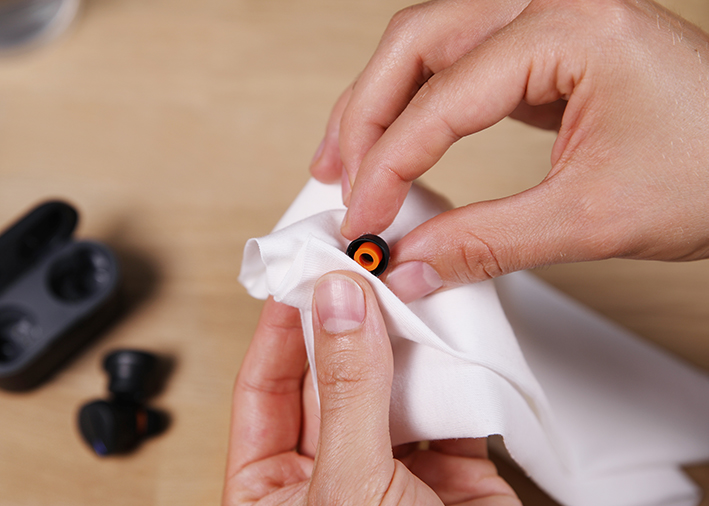
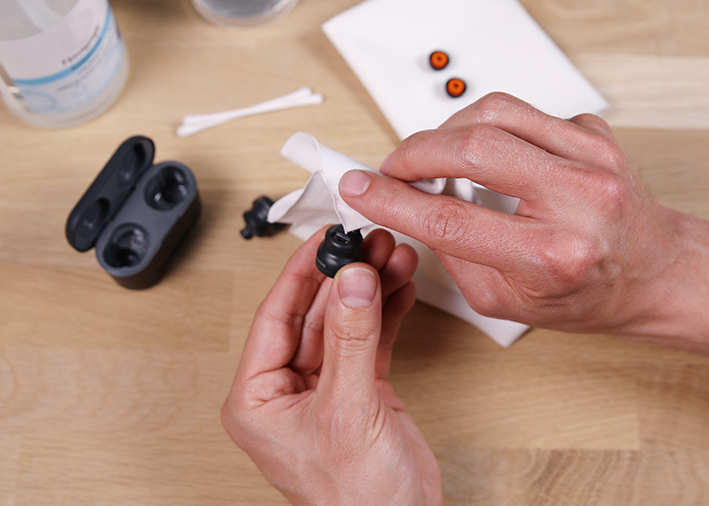
In-ears are the smallest type of headphones and are very popular due to their size, compactness, and flexibility. In-ears are available in different versions, for example as wired in-ears, neckband in-ears or true wireless earbuds. As the in-ear sits directly in the ear, both the front part, known as the eartips, and the housing are subject to a lot of strain. Excessive soiling can impair the sound if, for example, too much cerumen (earwax) builds up on the protective grille or in the ear tip.

Today we’re going to give you tips and tricks for cleaning your in-ears so that you can enjoy your headphones for a long time, and we will show you the individual steps using the example of our True Wireless In-Ears Free BYRD.

If you want to clean your over-ear or on-ear headphones, you can find out everything you need to know in the article Cleaning headphones: This is how it’s done!

TABLE OF CONTENTS
beyerdynamic blog Tipp

In general, in-ears should only be used in healthy ears. If you have an ear canal inflammation or other ear diseases, we strongly advise against using them until the disease has completely healed. To avoid inflammation and infection of the ear canal, the in-ears should be cleaned regularly as described above.

Cleaning of in-ears in case of soiling

Cleaning your in-ears can essentially be divided into two steps: The eartips are cleaned first, then the headphones themselves are cleaned.

Utensils you need to clean your eartips and in-ears:

  • Cotten buds
  • Soap (pH-neutral)
  • Soft, lint-free cloth
  • Lukewarm water
Utensilien für das Reinigien deiner In-Ears

Now let’s start with cleaning the eartips.

Step 1: Cleaning the silicone eartips

If your in-ear model has removable eartips, we recommend cleaning these first. The eartips are usually easy to put on and take off, so removing them should not be a major problem.

Once the silicone eartips that have been detached from the headphones, they can be cleaned with (or under running) lukewarm water and a little hand soap (ideally ph-neutral soap). Any cerumen that may be inside the ear tip can be removed with a cotton bud.

Ear-Tip mit Seife reinigen

It is important that the soap is rinsed off well afterwards and the eartips are dried. If necessary, a lint-free cloth can be used to dry the ear tips.

Ear-Tip trocknen nach der Reinigung

The silicone eartips should only be refitted to the in-ear once they are dry in order to ensure that no remaining liquid gets into the electronics of your headphones via the eartips.

Cleaning your foam eartips

In addition to the five pairs of silicone ear tips, our True Wireless In-Ear Free BYRD also comes with three pairs of foam ear tips. Due to the soft, porous material, foam eartips should not be cleaned with water, as this can impair the function and quality of the foam in the long term. Contamination can be carefully dabbed off with a soft cloth. From a hygienic point of view, it is advisable to replace foam earmoulds after a certain period of wear.

After you have cleaned the eartips and perhaps have just let them dry, you can now turn your attention to cleaning the headphones.

Step 2: Cleaning the housing of your in-ear

You should only clean the housing of your in-ears with a soft, lint-free cloth. You can moisten the cloth with lukewarm water if necessary, but make sure it is not too wet. If you want to remove cerumen from the housing, you must ensure that it is not rubbed into the small openings for pressure equalisation and the microphones.

In-Ear mit einem Tuch in Richtung Nozzel Part reinigen

In the case of very heavy soiling, it is recommended to wipe it from the body of the in-ear towards the nozzle part, using a new, clean cloth for each movement.

If the cerumen grid is heavily soiled, the sound of the in-ears will be significantly impaired. Before cleaning the cerumen grid, it must first be ensured that the cerumen deposits have dried. If this is not yet the case, wait until the cerumen has dried before cleaning. The in-ear should not be used while you wait.

The cerumen can then be carefully wiped off with a cotton bud (or optionally a small brush). The headphones should be held in such a way that the nozzle part is pointing towards the floor. This way the detached cerumen residue will not fall into the headphones.

Cerumen Grid des In-Ears mit einem Wattestäbchen reinigen

The NO-GOs of in-ear cleaning

Under no circumstances should you use wet wipes of any kind for cleaning. These usually contain substances such as oils or alcohols, which can aggravate the skin in the ear and cause irritation. Disinfectants should also be avoided, as the solvents they contain can attack and damage the surface of the headphones. This will also prevent your skin from coming into contact with disinfectant, which could also cause irritation.

Wet wipes (such as skin cleaning wipes, glasses cleaning wipes, toilet wipes or baby wipes)

X Disinfectants (such as hand or wound disinfectants)

Soft, lint-free cloth

Soap (pH-neutral)

X Wet wipes (such as skin cleaning wipes, glasses cleaning wipes, toilet wipes or baby wipes)
X Disinfectants (such as hand or wound disinfectants)
Soft, lint-free cloth
Soap (pH-neutral)

Drying in-ears when damp

In-ears are often used when travelling or doing sports. Because of this, the headphones can quickly get damp or wet, whether due to sudden rain or sweat. Moisture can temporarily affect the sound of your in-ears as soon as the tiny openings, which are necessary for optimum sound reproduction, are blocked by small drops of water.

Drying a damp in-ear 

If the in-ear has only become a little damp, for example due to sweating during sport, it is perfectly sufficient to dry it with a lint-free cloth.

Drying a wet in-ear

Has your in-ear gotten wet due to rain and do you have the feeling that the sound has changed? Then you will need to allow a little more time for drying:

Step 1: Dry the in-ear including the eartips with a lint-free cloth.

Step 2: Next, pour a heaped tablespoon of salt into a small, sealable container – alternatively, you can use a standard household zip lock bag. Then wrap the in-ears in a handkerchief and place them directly onto the salt. The handkerchief is used as a layer of protection between the salt and the casing and is intended to prevent direct contact between the casing and the salt. The salt must never be sprinkled directly on the headphones. Then close the selected container so that the salt only absorbs the moisture from the headphones and not from the room air.

Step 2: Next, pour a heaped tablespoon of salt into a small, sealable container – alternatively, you can use a standard household zip lock bag. Then wrap the in-ears in a handkerchief and place them directly onto the salt. The handkerchief is used as a layer of protection between the salt and the casing and is intended to prevent direct contact between the casing and the salt.

In-Ear in Taschentuch wickeln zum Schutz vor Salz - In-Ear Trocknung
In-Ear Reinigen Beyerdynamic Blog

The salt must never be sprinkled directly on the headphones. Then close the selected container so that the salt only absorbs the moisture from the headphones and not from the room air.

In-Ear Reinigen Beyerdynamic Blog

The NO-GOs of in-ear drying

True wireless in-ears such as the Free BYRD are equipped with the finest electronics, which can react sensitively to heat. For this reason, never dry your in-ears:

X with a hairdryer

X in an oven

on the radiator or in front of a fan heater

X using similar heat sources

X with a hairdryer
X in an oven
X on the radiator or in front of a fan heater
X using similar heat sources

How moisture and dirt affects the sound

Moisture and dirt can impair the sound of your in-ears. Sometimes you may only initially notice that the sound has changed, and not be able to determine that this is the cause.

The crucial parts of an in-ear are the openings. There are three important areas that can be affected by dirt, grime and moisture.

Pressure equalisation hole: A blocked pressure equalisation hole prevents the displaced air from escaping when the in-ear is inserted into the ear canal. This causes a crackling noise when it is inserted because the displaced air crumples the speaker cone. In extreme cases, this can damage the speaker.

Sometimes a suction cup effect also occurs if too much air has been displaced. The air is prevented from flowing back and the eardrum is pulled out of its resting position, which feels uncomfortable.

Bass reflex tube: If the housing is dirty in this area, the sound of the in-ears will be perceived as low bass. This causes the headphones to have a rather telephone-like, weak and thin sound.

Microphone opening: If the microphone opening is blocked, the microphone will no longer pick up the sound properly. This can affect the Active Noise Cancelling (ANC) function of the headphones and sometimes cause noise. In addition, the Ambience or Transparency mode may be impaired, and it will be difficult for the person you are talking to understand you properly due to additional background noise.

With our tips and tricks for cleaning and drying your in-ears, you should now be able to rectify any problems and prevent potential problems. We also recommend regular cleaning to prevent excessive soiling of the cerumen grid, as this may make complete cleaning impossible. Careful and regular cleaning is also advisable in terms of general hygiene and your health.

Digression: Background knowledge on ear hygiene and health aspects of in-ear cleaning

Would you like to find out more about ear hygiene? Then you’re in the right place. To conclude, we’ll give you a little background knowledge about the ear and its hygiene requirements.

The tasks of earwax, the so called cerumen, in our ears are manifold:

  • It lubricates the skin in the ear canal and keeps it supple
  • It removes foreign bodies such as dust from the ear
  • It contains a natural antibiotic and protects our ears from bacteria

Despite these important functions, regular and above all correct cleaning is necessary. Never insert objects such as a cotton bud into the ear canal, as there is a risk that:

  • the eardrum could be damaged,
  • the ear canal could dry out,
  • too much cerumen could be removed, neutralising the bacterial protective barrier
  • the cerumen could be pushed even deeper into the ear canal, causing it to become blocked

But how do you clean the ear properly?
When it comes to the daily washing routine, the ear canal should only be cleaned when necessary, i.e. not every day. All you need to do is put a handkerchief over your index finger and run it lightly along the entrance to the ear canal. The ear canal itself should not be touched any further, as this would be counterproductive. If you have an itchy, dry feeling after cleaning the ear canal, you have dried out the skin too much. In this case, cleaning should be suspended for a few days and the entrance to the ear canal should be carefully and lightly creamed with a mild fat cream (not a moisturiser).

Wie bewertest du diesen Artikel?

Rating: 0 / 5. Anzahl Bewertungen: 0

Did you find this article helpful?